Are you ready to jump right in? Great!
If so, this guide covers all the basics of what is needed to get started.
By now you should have received your login credentials. If not, please click the “login” link at the top of this page and click the “forgot password” link to request a new password be sent to you.
This guide explains the article types and formatting of articles based on type. It also explains how you are to go about submitting your posts. It also serves as a cheat sheet to help you get acclimated with our site faster.
You should definitely bookmark (ctrl +d) this page for easy reference.
If you’re low on article ideas, starting with Google and Yahoo trends would be a good way to find topics to write about. It’s also a good way to find some of the most heavily discussed events recently that could provide really good traction for your article which could lead to a ton of traffic and lots of people viewing your piece.
There are other types of articles of course that you can write about, but the quickest route is to report the news and these trending tools are very important and could become essential to your writing career.
Jumping Right In
Once you login, you’ll see a menu bar that gives you quick access to posting.
Click on the “+” icon.
![]()
Then click on “Post” and you’re good to go.
General Formatting Tips
These are just some general formatting tips for some of the most common issues and problems that arise.
Linking in Articles
Links should be relevant, appropriate and add value to your article. Make sure to use short and relevant anchor text when linking (e.g. Getting Started). Avoid displaying and linking of full URLs (e.g. https://theurbantwist.com/knowledgebase/getting-started/). Be sure to link to relevant The Urban Twist articles whenever you can.
There are two ways that you can add links to your articles.
The first method is that you highlight the text you want to link and select the hyperlink icon in the toolbar.

You copy/paste the URL into the field shown above or if searching for an article to link to that’s on our site, type in some keywords to find the relative article.
Press Enter.
The second method is much quicker and easier. All you have to do is copy the URL with the Ctrl+C command and then highlight the text that you want to have attached to the link and then paste the link by using the Ctrl+V command.
You can see a brief video of this in action by watching this video.
Try to add at least one or two links to your article whenever appropriate as a way to reference a source, or give credit.
Image Quality
All images used in articles must be of good quality. Avoid blurry, poorly cropped, and irrelevant images. Images have to be engaging and shareable on social media.
Only scale images down, never up, whenever possible. If you struggle to find a suitable image, let us know and we’ll help. Please see this post for more info on where you should go to find your pics.
Watch this video for a quick visual walkthrough of how to add images to your posts.
Article Titles
Correct use of capitalization is essential. First letters should be capitalized, except for short words (under 3 characters). Avoid excessive punctuation and long titles. Spend time creating a title that accurately depicts the article in an engaging way.
The first letter of all words in headlines must be capitalized, other than certain conjunctives, such as “and”, “the”, “to”, “at”, etc.
The Easiest Way to Ensure Correct Capitalization is to Use the Conversion Tool at www.titlecase.com. Simply paste your title into the left-hand box and hit the ‘convert’ button; your correctly capitalized title will appear in the right-hand box, for you to copy and paste.
Try – as much as possible – to keep your title as short as you can. Make one point with your title; do not ramble or try to make multiple statements, so that the reader knows, at a glance, what the focus of the article is.
Use as little punctuation in article titles as you can. Craft your titles to make sense without punctuation, if you can.
If your title requires punctuation, however, then use it! Nothing looks worse than a title that is grammatically incorrect.
Acceptable: Justin Bieber’s Monkey Seeks Asylum
Not acceptable: Justin Biebers Monkey Seeks Asylum
You’ll find plenty of articles that are ranked highly on Google News that contain question marks, colons, semi-colons, apostrophes, and commas. Use when necessary, but try to avoid using punctuation in article titles if you can.
Justin Bieber Surprised as Monkey Seeks Asylum
Image Attribution
The correct practice will be determined by the website you obtain the image from, e.g. Flickr and Wikimedia Commons are great resources to use. If no guidelines are specified use this format: “Image: Source/Website Name” referencing the source and linking to the page the image is located on.
You’d add this attribution to the “Featured Image Credit” field underneath the Post Settings tab in your post editor.

You’d then click on the “Standard Post Layout” tab.

You then can add a caption (if you choose to do so) and type in the source of your photo in parenthesis. So it’d look a little something like this:
The caption for the featured image goes here. (Photo Credit: Source/Website Name)
Tupac and Biggie (Photo Credit: Tom Jones/Associated Press)

Subheaders
Authors should use “Header” tags for subheaders to give their articles more structure and draw the reader to key points of information. They are great for SEO, and content-heavy articles also require subheaders to break up the article to keep the reader interested.
Article Requirements
As time goes on and you get the hang of how to submit your articles, because the bulk of this job is repetition and learning as you go on the fly, there are a few basic requirements that every article needs to have, regardless of type.
1. Every article needs a featured image.
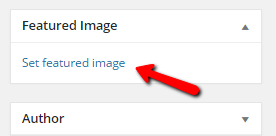
The “featured” image is the image that will show throughout our site for your article. It’s also the image that will be shared on our social media channels as well. The width of this image uploaded has to be at a minimum, at least 675 pixels wide. You can set the “featured image” for your article by clicking the “Set featured image” link from within the post editor.
To see a video tutorial of how to use this function, please watch this brief video.
2. Every article needs an excerpt.
An excerpt is an optional summary or description of a post; in short, a post summary.
On our site, an excerpt is expressively used as an introductory area that references the content in your article. It could also reference a source from where your article got its info from. Think of this as a lead-in to the article. An excerpt should be one or two sentences preferably, but no more than three.
The excerpt is also our status updates on our Facebook and Twitter pages that get attached to your links when they publish automatically.
You need to turn the “Excerpt” option on when writing your first post. The option will remain on for subsequent posts after turning it on for the first time.
To turn this option on, you need to click “screen options” at the top of the post editor.

Then make sure the “Excerpt” box is checked.
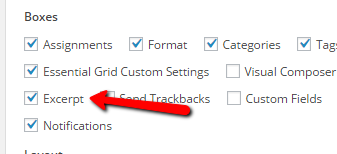
You should now see the excerpt box below the post editor.

Now you can type in your excerpt and get your post ready to go live.
To visually see how to go about doing this, please watch this brief video.
3. Your article needs at least one category and tags.
Categories, to put in layman’s terms are our site’s table of contents, and tags act as index words helpful for navigation.
Categories are meta-information used to describe the content of your post. So if you’ve written a post about the reelection of Barack Obama, then the category “Politics” should be used.
It’s okay to use more than one category when needed (but no more than two). For example, if you do a story on Beyonce’ singing at President Obama’s inauguration, then you may want to use the “Politics” and “Entertainment” categories, or to be more specific, you may use “Music” which is a subcategory underneath the Entertainment category.
Categories help readers find your content by telling them what it’s about (eg: Politics, Entertainment, Music) but are also used with connecting related material.
To add a category, look beneath the “Category” heading on the right-hand side of your page. You’ll find a list of available categories, simply scroll down and tick the applicable box(es).

It’s important to note that if your article takes on a more opinionated than just simply delivering the news, you should make sure to include the “Opinions” category.
Tags are keywords that tell the audience what the article is about. They also list subjects within the article. Tags are important…very important. Tags help search engines index our site based on things that the public may be searching for. Include at least 2-3 tags with each article. A quick example would be, if your story was about the cow jumping over the moon, your tags may be “cow, jumping moon, outer space” or something along those lines. Tag words are separated by commas.
Tags should be no longer than 1 or 2 words.
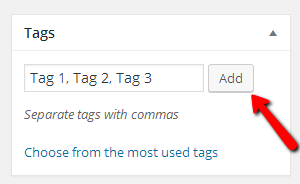
Ideally, you should add 3-4 tags per article.
4. Pick a post layout for your article type.
In the majority of most cases, you would leave this as default and won’t have to change this underneath “Post Settings” tab found below the post editor.
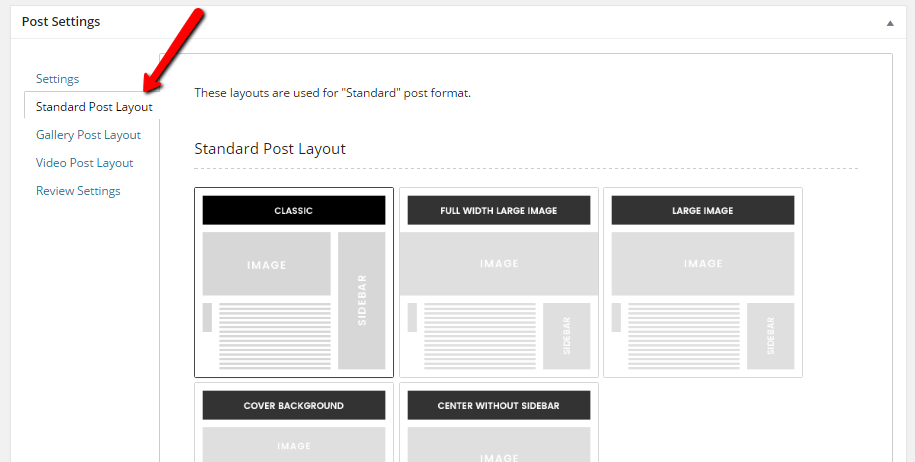
The Classic “Standard Post Layout” is suitable for most articles and is the default layout used if you weren’t to change anything.
For other article types such as Video Posts, Gallery Posts, and Review Posts this would need to be changed.
You can find out more about article types and when these layouts should be changed by going here.
5. Article needs to be search engine optimized (SEO).
When writing your piece, you sometimes have to keep search engines in mind when doing so because proper titling and tagging can result in exponential traffic growth through Google and other search engines. There are some videos in the training area that walk you through SEO (search engine optimization) of your articles and you may want to review that before you proceed through it for the first time.
It could seem a little overwhelming at first, but repetition, as with most things is key.
Submitting Article for review
Once you’ve written your article and given it a headline, and followed all of the required steps needed for SEO, then you need to select “pending review” and click “Save as Pending”, from the Publish options.

From here, an editor will review your article. The article will either be published, or you’ll be emailed with suggestions for improvements.
Please note that you won’t be able to submit an article for “Pending Review” unless all of these steps in the checklist are completed.

You’ll see this “Requirements Checklist” on the right-hand side of the post editor.
Over time, writers with good editing and writing skills who submit regular and consistently high-quality content will be able to publish their own articles directly without direct editorial approval although the article may still or can be edited.
Please note: If you are not sure or want clarification of whether or not an article idea you have will be suitable for our site, select “Pitch”, and then within the post explain in a few sentences what you want to write about and then click “Save as Pitch”, from the Publish options as described above for “Pending Review”. We will email you to let you know if we have any questions about what you have outlined and will give you the go ahead to continue and add your content.

